Driveways and Paths
Concrete Resurfacing: What You Need to Know
What does concrete resurfacing actually mean? Simply put, it's a way of making your tired, old concrete look like new. Read on to find out more about it.
Staff Writer
Nov 16, 2023
What does concrete resurfacing actually mean? Simply put, it’s a way of making your tired, old concrete look like new. To achieve this, a special mix of concrete resurfacer is layered over the existing concrete.
Unlike your typical concrete or mortar mix, concrete resurfacers contain bonding agents to ensure that the layer of resurfacer sticks properly to the old concrete. Concrete resurfacers come in plain grey, but they can still be stained or painted like ordinary concrete.
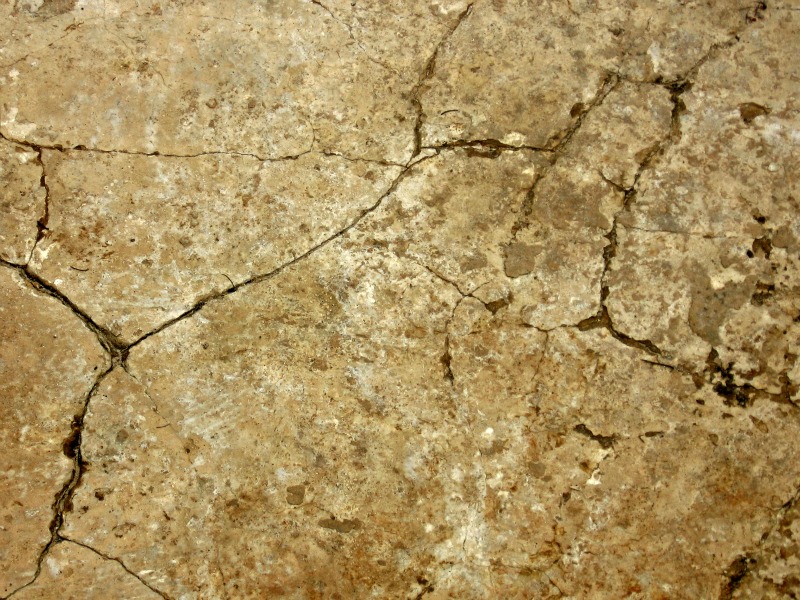
Replace or resurface
If your old concrete surface is cracked all the way through, a resurfacing definitely won’t solve the problem. So, your decision on whether to replace or resurface will depend largely on how damaged your old surface is. For cracks that only penetrate about an inch or two of your concrete, resurfacing is a good, affordable solution.
Comparing costs
A bag of concrete resurfacer can cost as much as ten times a bag of ordinary concrete mix. With this info, you’d probably think that concrete resurfacing is actually pricier than just replacing your old concrete. BUT! If you consider the cost of the entire job, resurfacing your old concrete path, floor, or driveway will still turn out to be the cheaper alternative.
Replacing your old concrete surface requires breaking it up, disposing of it, and pouring a new slab. More steps mean more contractors, more time to finish the job, and definitely more costs. Also, while bags of resurfacer cost a lot more than bags of concrete mix, you’ll need fewer bags of resurfacer to do your entire concrete surface.
Is it a DIY project?
To answer this question, you need to know how it’s done first. Concrete resurfacing begins with a pressure wash of the surface. The old concrete has to be free of oil and other spills to ensure that the old concrete won’t get weak and that the resurfacer adheres well. Next, cracks and holes are filled, primed, reinforced, and ground down until the surface is smooth.
Once you’ve prepped your old concrete, it’s time to apply the resurfacer. Different types of resurfacer are mixed and prepared differently, so the application will be based on the manufacturer’s instructions. Most resurfacers can be applied using a squeegee, trowel, or sprayer. Afterwards, the new surface is sealed and cured for several hours.
If you’re an experienced DIYer, you might be able to tackle this job. Going the DIY route can save you a couple of dollars, but make sure that you’re capable enough to do an adequate job. Otherwise, you’ll just end up spending more on patching up a horrible DIY job.
To get the best results, it’s still best to leave this process to concreting experts. Get quotes for your concreting job here.