Discover different types of grout and their properties and recommended use. Get step-by-step instructions about how to grout tiles. Read more.
When you are thinking about doing the tiling work yourself, especially in your bathroom, the question of grouting becomes important sooner or later. Applying grout is not that difficult, but it is important. If you are looking for a quick answer about how to grout tiles here it is:
- Mix the grout
- Remove bathroom tile spacers
- Apply the gout on the tiles
- Leave it to settle
- Remove the excess grout
If you are doing your bathroom tiling on your own, you will have learn how to grout tiles yourself. However, if you hire a professional tiler, you can just pick your bathroom tiles and let them do all the work. You can be sure that the grouting will be included in your price.
If you are wondering what else is or isn’t included in your tile installation cost, ask your tiler in advance. List all the things you want done and get several quotes for the entire tiling work.
Now, let’s get into some more details about how to grout tiles:
Mix the grout – You need a clean bucket, some water and some protective gear for this. Grout is powdery and it is not exactly the thing you want to inhale, so protective face mask is advised. You will also need some gloves. Mix the grout and water until it all reaches pasty consistency. That is when your grout is ready for applying.
Remove bathroom tile spacers – Remember those? They are the reason why you have that space in between the tiles, in the first place. Don’t forget to remove them before you start applying grout. Apply grout only when you are sure that the tile adhesive is already dry.
Apply the grout on the tiles – Use the floater that you prepared for this job. Apply the grout and make sure it stays in the space between the tiles. The expert tilers say that the diagonal movements work the best when this is done.
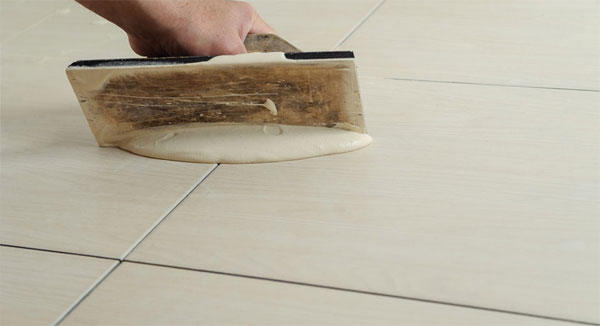
Image source: nustone.co.uk
Leave it to settle – This is actually something that you need to do twice. First, wait for half an hour and let the grout settle. Use water and sponge to wipe the excess grout off.
Remove the excess grout – After your grout has been settling for 3 hours after the initial wiping, it is time to wipe it again. Now make sure that you remove all the excess, so you can leave it to dry completely.
Are There Different Types of Grout?
Yes. There are four different types of grout. If you want to learn how to grout tiles, you should be aware of these 4 grout types:
| Different Types of Grout | ||||
|---|---|---|---|---|
| Type | Sanded | Unsanded | Epoxy | Furan |
| Use | All kinds of tiles, except marble. It can scratch marble tiles. Used on tile space smaller than 2 mm. |
Ceramic and polished marble tiles and tile joints less than 3 mm | All sorts of tiles. Universal use. | Industrial use. Rarely available for domestic use. |
| Features | This grout is mostly Portland cement and sand. When it dries, it is extremely hard, but it also has its downsides. Namely, it absorbs water easily, so it has to be sealed. | The composition also includes Portland cement, but with no sand added. Other additives are present. Usually, the additives are latex-based, to reduce the absorption which can be an issue. |
This grout is basically latex resin and hardener. It is extremely resistant to stains and it doesn’t absorb moisture. Keep in mind that the application is best left to the professionals, because it is very messy. |
Composition is mostly furfuryl alcohol, combined with epoxy. It comes only in black. The application is necessarily done by a professional with experience. |
How Long Does Grout Take to Dry Before Walking on It?
You need to wait around 24 hours before you can walk on the grouted bathroom tiles if you have chosen sanded or unsanded grout as your option. This is one of the most commonly asked questions by people who want to learn how to grout tiles.
If you don’t let it settle earlier than that, you will probably compromise it and have to do regrouting. Still, the manufacturer will have the drying time on the packaging, but the general rule of thumb is not to walk on freshly grouted tiling work for at least 24 hours, and preferably even longer.
Do You Need to Seal Grout?
You need to seal the sanded and the unsanded grout. Moreover, you have to seal it. Due to their composition both of these two types absorb moisture quickly. This means that they will probably turn black and attract mould and mildew.
On the other hand, epoxy grout doesn’t have to be sealed. It already contains latex which will not absorb water at all. However, while the epoxy grout will not suffer from the moisture and stains, some of the tiles will. For example, stone tiles have to be sealed for this reason, so if you don’t seal the grout, you will seal the tiles.
Can Caulk Be Used Instead of Grout?
Yes, it can be used, but mostly for indoor tiling work. Caulk and grout are fairly different and they have their pros and cons. Grout is sturdy and mostly cement based. This means it is hard and durable, and it connects well to the tiles. On the other hand, it will absorb the moisture and welcome mildew and mould.
Caulk is based on latex or silicone and that makes it more glue-like than grout. It is water resistant and that is great, but it also doesn’t “breathe” with the tiles and peels off easily.
There is little chance that you will just have to learn how to grout tiles. You will probably have to learn how to do the tiling yourself entirely or to leave the entire tiling project to the professionals. Don’t be discouraged by the cost of tiling.
Ask for tiling installation cost estimates from different Australian tilers. By receiving more quotes, you will have a better idea about the cost of your entire project and you will have a nice choice of tilers ready to do it.