Household Tips and Improvements
The white picket fence remains a ubiquitous and popular suburban feature for millions of house-proud Australian homeowners. Here's how to maintain it.
For so long a symbol of middle-class prosperity, the white picket fence remains a ubiquitous and popular suburban feature for millions of house-proud American and Australian homeowners.
It’s been used in advertisements, TV shows, and movies.
It’s a symbol of the suburbs and, for much of the twentieth century, part of the American Dream of a comfortable house, two kids and a dog.
Although there are many variations of the picket fence, the traditional white picket fence is the most popular style.
But other colour combinations can be used to create different effects. For example, choosing a grey shade for your picket fence and combining it with certain plants will add a countryside French-style look to your home.
Fact: The spacing between pickets was traditionally the same as the width of the pickets, which were either pointed or round at the top.
Steps to Achieving a Beautiful Picket Fence
Step 1: Plan a layout and decide on the purpose of the picket fence
No one can deny that a picket fence is pretty. A picket fence can be used to define a space for an outdoor lounge, to showcase a gorgeous garden, or simply for aesthetics.
If you haven’t already got one in place, your purpose for a picket fence may be to simply frame your garden or to keep pets and kids out.
Nosy neighbours, perhaps? A picket fence may not stop the nosy neighbors from prying, but your yard is sure to be their envy!
Whatever the reason, a picket fence should fit in seamlessly as if it had always been there!
Step 2: Pick a fencing material
Standard wood or vinyl and PVC designed to look like pickets are the go-to materials for picket fences.
Wood, usually treated pine, has been used for decades and is still widely used. Cheap, sustainable, fast-growing and carbon-neutral pine is ideal for most fencing jobs. However, it has the disadvantage of wearing down faster than synthetic materials in hot and humid climates, although many feel timber simply looks better than the artificial look of synthetic materials.
Step 3: Choose a gate, garden features, and a paint scheme
Picket fences, even if used for aesthetics only, look complete with a matching gate. This is because a garden gate is stylistically a perfect complement to a classic picket fence.
Consider planting a foundation garden around the fence to help tie in the fence with the yard, creating a cohesive impression.
Finally, get a great paint job. The picket fence has to look straight out of a lifestyle magazine or close to one. Avoid drips, visible knots, cracks, and other imperfections. A skilled painter or handyman will ensure you achieve good results while you focus on other work.
Depending on how much of the project you intend to DIY, you need the right tools and materials.
Choosing The Right Tools and Materials for Painting a Picket Fence
Tools and Materials
- A high-pressure cleaner, because a hose and brush will not cut it; choose a pressure cleaner that won’t splinter the wood, preferably one that’s no more than 2,700 PSI or less.
- A paint spray gun, because it’s more efficient than a brush and ensures an even finish
- A paintbrush and/or roller for sections that the spray gun can’t reach
- A paint scraper to remove stubborn chipped paint spots
- Outdoor paint that can withstand the elements
- A hand sander to smooth out any rough patches or splinters
- Gloves
- Sandpaper
- Safety glasses
- A drop sheet to cover the foundation garden or surrounding areas from paint splatter
- A bucket to dilute the paint
Preparing a Picket Fence for Painting
Wash the fence with a high-pressure cleaner to remove old paint layers and any surface grime. This works in the same way as it would when cleaning a roof. Take care to not focus the pressure washer on one spot, as this may damage the wood. You can achieve this by keeping a two-foot distance from the fence.
When the timber dries, scrape the remaining bits of paint that the high-pressure cleaner may have missed. Use a paint scraper, and be sure to leave no old paint remaining.
If paint removal isn’t your cup of tea, get a few quotes from professional paint removalists and use the time saved to
Sand down the picket fence to clean up the edges. Nothing looks worse than painting on a rough surface.
Replace any boards that are damaged beyond repair. Inspect the fence beforehand so you know the number of pickets that need replacing before you set up for the paintwork.
Tie back the bushes near the fence with twine, then cover the bushes, surrounding plants and footpaths with a drop sheet. The spray gun is great at applying paint to a fence but it won’t spare the surrounding vegetation from paint splatter.
Prime any bare wood. Any paint job needs primer, be it wood or plaster. Primer allows the painter to use less paint and ensures the target colour is achieved using fewer coats.
Unless using PVC pickets, choose a waterproof or moisture-resistant paint that can protect wood fences from the effects of moisture and humidity.
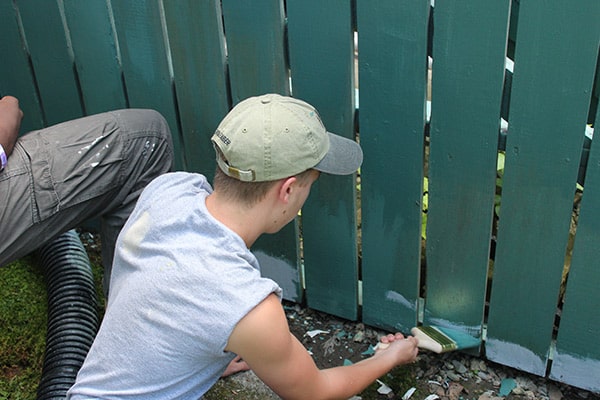
Painting The Picket Fence
Plan to paint on a warm day, hopefully, not a windy one, because the paint will be blown all over the place during the spraying process.
Using The Spray Painting Method
A spray gun is a handy tool that has saved painters and DIY enthusiasts hours of painting manually. It’s also a handy tool for any handyman with 'painter’ in their portfolio.
Other than saving time and effort, an even look is easily achievable with the spray gun method.
Spray Painting Steps
- The paint must be slightly diluted if you use a spray gun to allow the paint to flow easily through the nozzle.
- Don’t forget to place the drop sheet.
- Hold the spray gun so it applies paint to every bit of area facing in that direction before you switch to other angles.
- Use a brush to remove drips, especially around the nail heads. This step might seem unnecessary but leads to a flawless picket fence paint job.
- Wait for the first coat to dry before applying a second coat.
Using The Roller and Brush Painting Method
No spray gun? No problem. Do it old-school with a paintbrush or roller. Granted it will take longer to complete, but it will still yield the same result if done properly.
Roller and Brush Painting Steps
- After placing the drop sheet, begin by painting the bottom of the fence with a brush. On the vertical panels, use the roller.
- Wait for the paint to dry and cure before applying a second coat.
Maintaining a Picket Fence
- Repaint the fence as required. In between, check the paint condition of your picket fence and do small touch-ups with a brush if needed.
- Regular inspection to check for signs of decay and weather damage is non-negotiable if you want to maintain a perfect and strong picket fence – rot is wood’s worst enemy.
- Pressure washing from time to time helps remove surface grime.
- Reinforce loose boards by tightening the screws or adding new nails.
- Use waterproof wood glue to seal small cracks and monitor regularly for further deterioration.
- Take care when using chemicals for other yard activities. Some chemicals may react and cause damage to the timber or paint used in the picket fence.
Picket fence painting and maintenance is one of the cheapest and easiest ways to add to your curb appeal. So take advantage of the good weather and give your picket fence a much-needed facelift.