Photography
Deep etching 101
Deep etching… it’s used in the graphic design and photographic industry for the production and development of various marketing collateral ranging from magazines, brochures, catalogues, billboards even wedding photos. Deep etching is simply where you take an image and remove the background. It sounds simple, and some software does make this easy, but it is […]
Staff Writer
Jul 23, 2010
Deep etching… it’s used in the graphic design and photographic industry for the production and development of various marketing collateral ranging from magazines, brochures, catalogues, billboards, and even wedding photos. Deep etching is simply where you take an image and remove the background. It sounds simple, and some software does make this easy, but it is still a manual graphic process that takes time and patience.
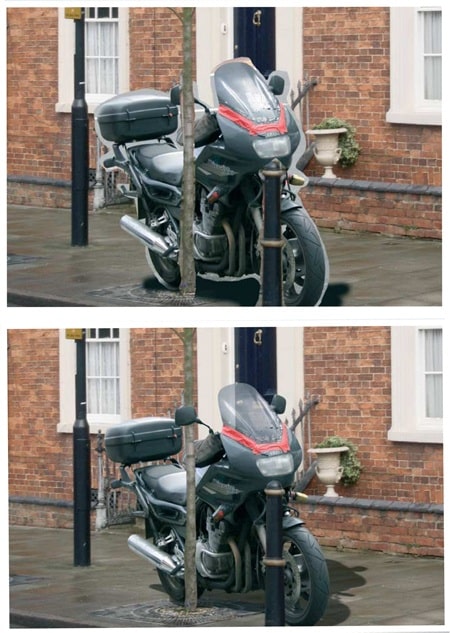
The process requires an eye for detail, and professional deep etching is evident based on a graphic designer’s experience. In the example image, there are only three elements: the background, the bike, and its shadow. But there’s a world of difference between the crudely selected version, the top, and the careful cutout below. Making accurate selections is the key to doing deep etching correctly.
Having the right software is crucial in achieving a professional outcome. Software applications that can be used to apply this technique vary from Adobe Photoshop, Paint Shop Pro and even a free software called Gimp. Most professionals use Photoshop, as it seems to be the industry standard.
There are various techniques learnt over years of experience and factors that go into achieving a professionally etched image. The most difficult part of deep etching would be selecting fly-away hair, which can take many hours and plenty of coffee to get the job done to a high standard. The Extract command can be helpful. Third-party plug-ins, such as Mask Pro and KnockOut, are great as well. But sometimes, the easiest way to select those random strands of hair is right in your Channel’s palette or using a masking technique.
Since the introduction of the “refine edge” tool in Photoshop’s latest versions, deep etching has become easier to manage and less of a time-consuming process. A technique that helps preview my edges and selections (with any selection tool active) in the colour I want is as follows:
Let’s say I want to see the background (an area I want to be removed) in hot pink,
- First, make your selection using either a magic wand or even a lasso tool.
- Go to the Refine Edge tool and double-click the quick mask option at the bottom of the dialogue box.
- Crank the opacity to 100%, choose a colour from the colour picker and click o.k.
Now, you can show your image against any colour and can change these options by double-clicking the quick mask.
There are literally hundreds of techniques that can be used to get a good deep etched image result, and the best result is not always due to the better designer but a better design process.
Author Gareth Evans is a graphic designer and runs Minio Design, a registered business on ServiceSeeking.com.au